Monday, June 16, 2014

Lots of handmade wedding invitations

Hey blogger world!

I've been MIA for sometime now. That's because I started feeling overwhelmed with everything we do: wedding photography, handmade baby items and handmade invitations .. on top of running after a very active 3 year old.

I'm back with a quick post about my latest invitations model: all white wedding invitations with a flat bow.

These were a challenge I got from Michaela (Germany). She sent me sketches of her dream wedding invitations. I agreed to show her a sample and she loved it.
Here's the result of my hard work. 


all white boxed wedding invitation

Invitation, box and extra informations card

Double insert text on a loosely attached paper (glued only in the middle)


Here's the link to my invitations.

Here's the board that I made to match these invitations:


Thursday, May 23, 2013

Wedding Tutorial DIY #2 - Making a rosette banner

Hello readers!

 I'm back with a quick tutorial on how to make paper rosettes with printed letters and turn them into a banner. It's really easy and the results are great! You can save money on your props for wedding or baby showers/photosessions etc.

 Here's one I did for a photsession for a 8 months old baby boy.


Here's how to do it:

1. Take an A5 sheet of paper and cut 1.5 inches strips on the length of it.


2. If you have a scoring board you can score the strips of paper every half an inch.


3. Start folding on the scored lines (accordion fold).  If you don't have a score board, you can straightaway get to this step.


4.  Add a bit of sticky tape at one end and stick the ends together.


6. Simply lay it flat and press with your finger gently to the middle. You can add some glue at this point or do like I did and stick the letters to keep it in place.


LETTERS: I printed out the letters in a fancy font and I used a glass to draw circles around them and cut them out. I could have designed the circles on the computer but I was too lazy to do it :)


This is how it should look. You can stick it on some pretty ribbon and you have a nice banner for your photos.


I hope you enjoyed today's tutorial. Let me know if you want to see more tutorials in the future posts.

Friday, May 10, 2013

Wedding Tutorial DIY #1 - Printing on pre cut tags

Hello readers!

 I'm caught with orders and shipping and my son all day long but I decided to start a new section on my wedding blog: Do It Yourself Wedding Tutorials. I hope I can keep up :)

 So, I got an order from Claudia for 
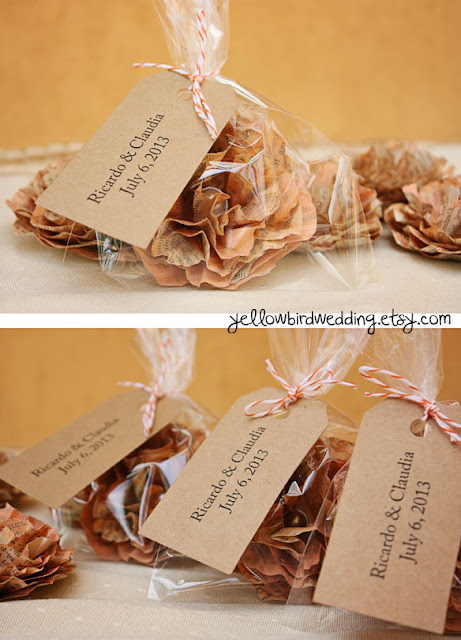
my handmade paper flowers. She wanted to gift them as favors at her wedding and she asked me if I could somehow package them for her. I gave her a couple ideas and she finally settled for this combination: cello bag + baker's twine + tag.

 I LOVE the final look:


Now back to today's tutorial. I want to show you how to print on pre-cut pieces of paper or tags. I discovered this (not sure if anyone else has tried it) back in India when I bought these nice card making kits that had small diecuts and I didn't have any stamps to stamp on them so I tried printing on them. As you imagine you can't directly feed the small tags into your printer... so here's how I do it!
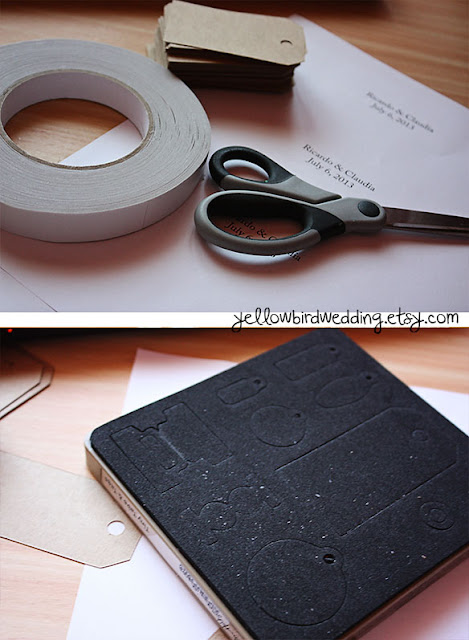
You'll need:
1. A normal printing paper
2. A printer with direct feed (haven't tried auto feed yet). Mine's an HP inkjet that takes on thicker papers and cardstock.
3. Your tags or pieces of paper. I cut mine using the Alterations Tags from Tim Holtz. For those of you that aren't familiar with die cutting  you need a machine like Sizzix or Cuttlebug to help you out here. Or you can take the easy way out and order your tags from ebay.
4. A pair of scissors
5. A double sticky tape or a tacky one.
6. A pencil.


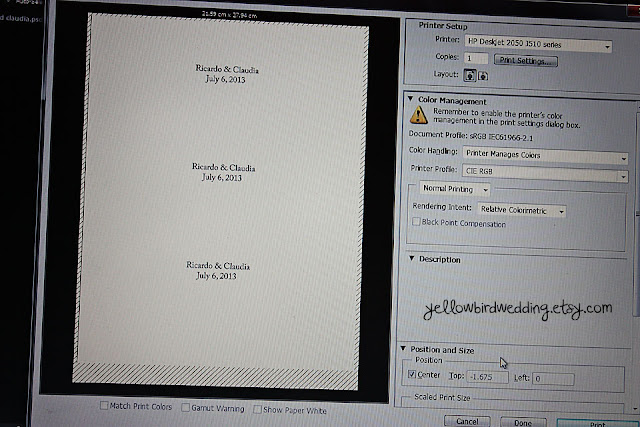
STEP 1: Design your text and test it out on a piece of regular paper to fit your pre-cut paper/tags. You can print more sizes on one sheet of paper and pick the one you like. When you're pleased with the size, take a new sheet of paper and print it out again using the size you liked best.
I am printing 3 tags at a time so I printed my text out 3 times on the sheet of paper.


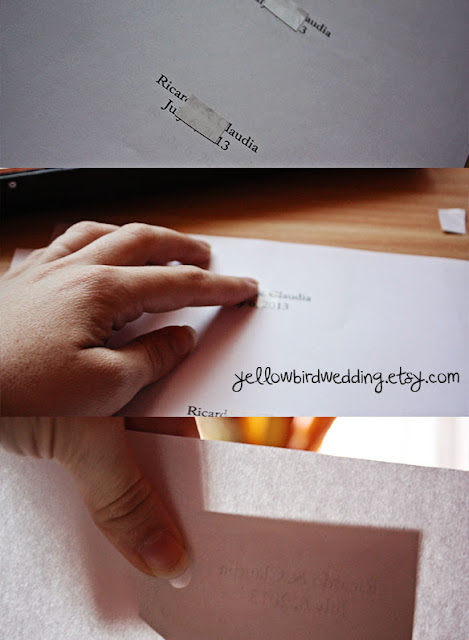
STEP2: Stick the tags to the printed paper, arranging them so the text would come where you want it to.
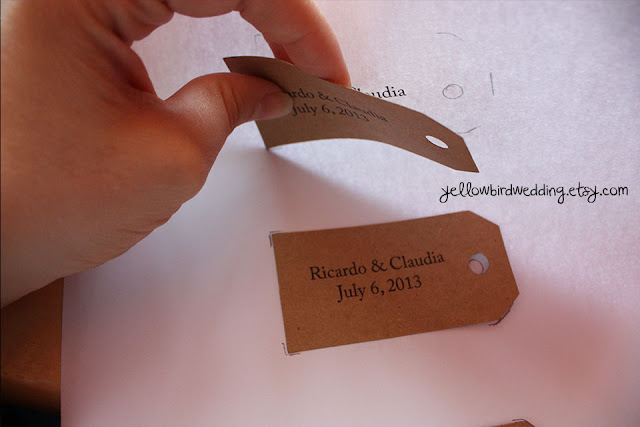
If you use regular double sticky tape, before you fix the tags, make sure you dab the glue with your fingers several times so it loses the strength to stick otherwise you will tear your tags (see the 2nd photo!)

STEP 3: Stick the tags in place.
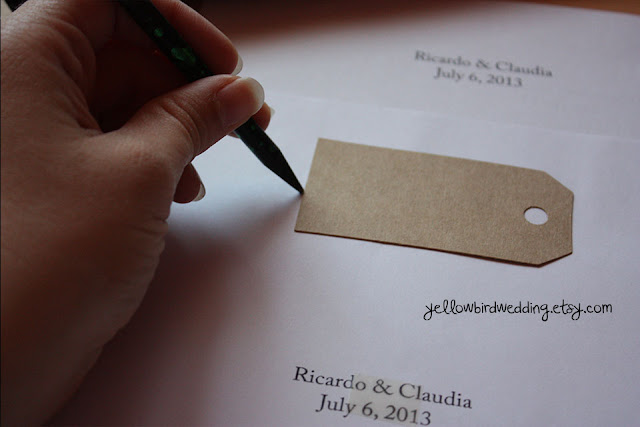
Optional: Mark the exact place of the tags with a pencil so it's easier to re-use if needed.


STEP4: Feed it to the printer! :) Make sure you introduce the paper the same way you did when you printed the text on the white sheet of paper. Hit Print again.
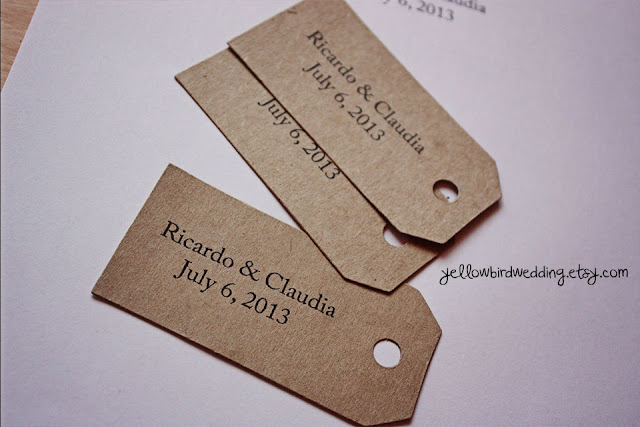
When it's done just carefully peel off your tags.


STEP5: ENJOY! You can use the same sheet of paper a lot of times over... until the sticky tape doesn't stick anymore. Be careful not to jam your printer ;) It works on mine but I think it depends from model to model.


Hope you enjoyed my tutorial! Let me know if you'd like to see more wedding related tutorials and I'll do my best to put some up for you.

See you next time!

Wednesday, April 17, 2013

Embossed papers and a touch of spring

Hello blog-world!

I'm not gone :)... as usual I was very caught up in orders and what not. I'm in a good mood because spring has finally hit us! I'm out most of these days running after Marc. He absolutely loves being outside and playing.
Here's a little something my sister clicked in our garden.

HAPPY SPRING!

I am back today with a quick post on my current embossing models. They each have a name in the "bubbles".
Please note that I can get you other models as well, if you have a certain pattern in mind just let me know and I'll do my best to find that pattern.


These last 2 are NOT made by me. So they are subject to availability from the supplier. They are available in cream (like the photos), white or burgundy.


That's it for today! I still have a LOT of wedding invites models to show you so hopefully I can cover them all soon.

Hugs!

Thursday, February 21, 2013

Greek style wedding invite - teal and white

Hey there readers!

I'm back with a model I made for a customer in Italy. She wanted delicate teal and white wedding invites. I made her a few samples and this was one of them  (the rest will come one by one, each in its own post)...

You can find this invite here.


I know most people would think... huh Greece: olives, white houses, blue water. Probably I would have chosen an olive green and not a teal if I had that thought process... and who knows how the final invite would have looked like.
But if you know me, I never think quite like that when I make my creations. In fact I shut down any thinking and I just let go of the feeling. It just kind of got together like this and even if it didn't hit me at first, now it just clicked in my head that this would make a perfect Greek Style Wedding Invitation in beautiful teal blue and white.
I think the embossing pattern matches exactly the laurel wreath (That's where my name comes from by the way) and the olive leaves!
The pealy metallic finish gives the center piece just enough shine to highlight a long gone glory of the old Gods of Olympus and the small scroll patterns I hand stamped just remind me too much of the Ionic Style Greek Columns :).

That being said, teal will match perfectly with a hot summer in Greece, in a small white house on a cliff overlooking the deep teal  Mediterranean sea... don't you agree?

And no, I've never been to Greece... yet! I think I got influenced by a book I just finished reading, a remake of the old love story between Cupid (Eros) and Psyche. It was a nice read that probably just made me unconsciously assume a part of Greece somewhere in my creative thought.

Whatever it was, I am very pleased with how it all turned out. Here's a wedding board I made myself :)

http://www.w-weddingflowers.com/unconventional-wedding-bouquets/
http://www.vacation-in-greece.gr/santorini/santorini-nightlife.aspx
http://www.etsy.com/listing/93531686/wedding-ring-bearer-pillow-aqua-teal
http://geniusbeauty.com/fashion-and-wear/how-to-choose-wedding-dress-bridal-accessories/#.USZyr6VmiSo
http://theaandsami.blogspot.ro/2011/09/modern-wedding-style.html
http://www.etsy.com/listing/92933348/bridal-headpiece-tiara-headband-golden
http://www.etsy.com/listing/83795853/silver-brooch-pin-antique-style-jewelry
That's it for today! I hope you enjoyed my creative rumble ;)

Hugs!

Tuesday, February 19, 2013

Hawaii wedding invitation - modified version

Hello bloggers!

Vanessa asked me if I could make my Hawaiian invitation fit into an envelope instead of a box so I took on the challenge and came up with 3 different models of flat flowers.
I didn't want them to be one piece and flat... that would have looked very boring and plain so instead I kept the petal-by-petal technique and got this:


She chose the first model, watercolored flower. I'm about to ship them so here's a peek of what the final wedding invites look like:


They all come in metallic finish envelopes and I think they're the perfect example of less is more. If you know how to combine color and simplicity you'll get stunning results for your wedding!

Here's another inspiration board on Fuchsia and Olive color combination (I made this one... you can see the links in the caption).
I LOVED the Indian bride on the last photo! Perfect to illustrate just how exotic can a simple color combo go.

http://www.etsy.com/listing/71535677/olive-green-bridesmaid-clutch-or-olive
http://www.theknot.com/weddings/photos/fuchsia
http://www.weddingomania.com/vibrant-torquoise-and-fuchsia-wedding-inspiration/pictures/4172/
http://www.my1stwish.co.uk/sale/footwear/fuchsia-diamante-bridal-high-heels-wedding-shoes.html
http://www.thebridalshop.com/Mori_Lee/8146.htm
http://www.marthastewartweddings.com/228780/perfect-wedding-color-palette-fuchsia-and-taupe/@center/272434/plan-your-wedding-color
http://bridalmusings.com/2012/05/vibrant-fuchsia-indian-wedding-orchids-and-pretty-parasols/
Hope you liked my post today! If you did, share some love.

Tuesday, February 12, 2013

Kraft and white wedding invitaiton - cage and flower

Hey there readers!

I'm back with an invite that got born in a creative brainstorming with my sister. You can buy it here.

I love kraft but unfortunately we can't buy it here, in Romania. I need to order it from the US and it becomes pretty expensive. Nevertheless I decided to use it for a special, rustic and romantic wedding invite.

We also made a matching RSVP card and a handmade kraft envelope (but if I get any orders on this one I am going to buy the ready made kraft envelopes).


Special cut and embossed edge, diecut cage and a handmade flower made out of crepe paper for a delicate look. I used a piece of a diecut doily for the RSVP to match it.


I designed a text for the inside on creamy white cardstock and I decided to go one step further and add a lacy upper border to this one.


How do you like it? :)

And here's the usual board inspiration for craft and white:

http://so-lovely-moments.com/2013/01/inspiration-kraft-white-wedding.html/kraft-white-wedding
Just love all those textures!